The Functionalities of a GoPro Session 4
What is a GoPro Session 4?
A GoPro Session 4 is the first cubic camera developed by GoPro that allows for fast and versatile recording. Arguably the smallest and lightest model launched by GoPro, this tiny camera was designed for versatility and commodity. The GoPro Session 4 comes with a variety of items that will help users during their adventures for a better and lighter experience.
As shown in figure 1, this is what comes in the box; a GoPro session 4 with integrated battery, a micro USB charging cable, a standard frame, a low profile frame, curved and flat base mounts, a locking plug, and three mounting buckles: mounting buckle, vertical mounting buckle, and a ball joint buckle.
Figure 1
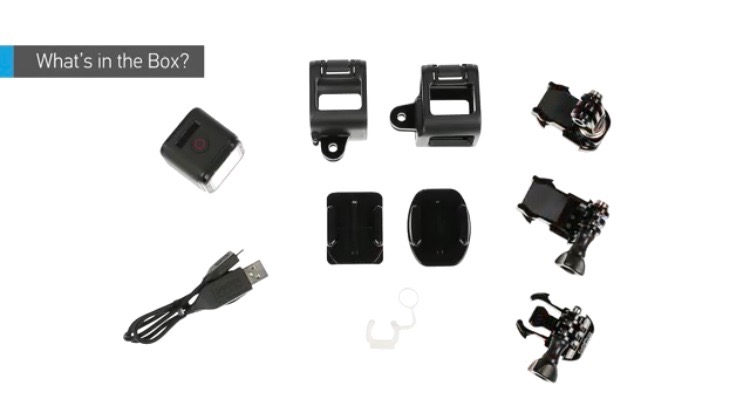
Taken from GoPro original website.
According to GoPro’s original website, the Session 4 has only two buttons; one big button for recording locate on the top along with a small display screen, a wireless button that allows the user to navigate through the settings, and a side door where the memory card and USB port are located. The session 4 dimensions are 33 x 33 x 31.3 mm. Its cubic shape gives it the upper hand on previous models since the lens is right in the front of the camera. Allowing for better positioning of the camera in case the user wants to rotate the angel; they can take the camera out of the frame case and turn it to the desired angle. The GoPro session 4 is also waterproof up to 10 meters underwater; this makes it perfect for water-related activities like surfing and diving. Just make sure that the side door it’s closed.
How does a GoPro session 4 works?
Previous cameras launched by GoPro possess a standard set of components which makes them perform their function at their best. However, the GoPro session 4 was designed to fulfill specific tasks and situations, which sets it apart from any other previous model. Its small size, low profile design, and water resistance make it perfect for water-related and high paced sports/activities. (See figure 2)
Figure 2
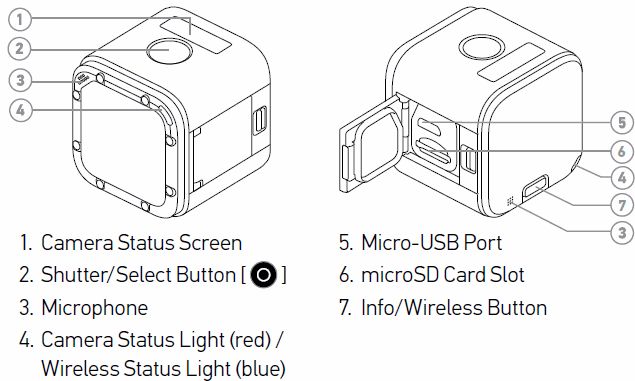
This image was taken from a forum called 3DRPilots
The Len
Undoubtedly the most critical part of any camera, session 4 lens covers about 99 percent of the front of the camera. With a capacity of recording at 60 frames per second and a resolution of 1440, session 4 allows users to record fast-paced action in the go.
Camera Status Screen
On the top side of the camera, there is a small screen that allows users to see the camera status as well as doing some minor changes in settings without having to look at the phone app. However, for better control over configurations, it is always recommended to use the GoPro app.
Shutter/Select Button
One of the only two buttons this camera possesses is the shutter or select button located on top of the camera, besides the status screen. This button functions as a way to start recording by just pressing it once. Also, this button allows the user to switch and select different settings.
Microphone
With two powerful microphones, one in the front and the back of the camera, the session 4 will record high-quality audio with perfect audio-footage synchronization. The receivers are located in the front and the end of the camera, providing a 180-degree angle audio recording coverage.
Camera status lights
Immediately after pressing the shutter button, a red light with appearing in the front and the back of the camera. Rapidly blinking, this red light signals that the camera has started recording. On the other hand, when pairing the phone app and the session 4, this one will display a blue light to indicates the status of the connection. Since there is not much hand to hand interaction between the camera and the user, this system of lights makes it more intuitive to the user and overall improves the experience of using a session 4.
Micro-USB Port & Micro-SD Card
These two components are located on the left side of the camera, locked away and protected from any dust or water from coming in. As their names indicate, the micro-USB port allows the user to charge, and directly connect to the session 4, if desired. On the other hand, the micro-SD card is the memory of the camera, and it is modifiable to whichever capacity the user wants.
The Wireless Button
Located at the back of the session 4, this button function as a way of triggering the connection between the GoPro phone app, and the camera. Just press the button once, and wait for the blue lights to start blinking. Once these are flashing, proceed to connect your session 4 via wifi and Bluetooth. After this process is completed, the lights will stop blinking, and the user will be able to record from the phone and hands-free, while still being able to control advanced settings from the phone app.
In conclusion, for a lighter and versatile experience, the GoPro session 4 is the best choice for those who enjoy water-related sports and extreme activities. Equipped with the necessary features that will make the user’s adventures easier while at the same time recording high-quality footage, session 4 raises above its competitors — demonstrating that its size is nothing more than another feature that adds to its versatility.
References
Czrlaker. “Gopro Hero 4 Sessions? 3dr Solo Compatible?” 3D Robotics Drone Forum, 6 Sept.
2017, 3drpilots.com/threads/gopro-hero-4-sessions-3dr-solo-compatible.3759/.
“GoPro Hero Session 4.” Nazad Na Početnu, 28 Nov. 2018,
www.olx.ba/artikal/31008097/gopro-hero-session-4/.
“HERO4 Session Quick Start: Overview Pt 1.” GoPro Channel, GoPro, 14 Mar. 2019,
gopro.com/channel/product-stories/hero4-session-quick-start-overview-pt-1.
Self-Assessment
For this assignment, the greatest obstacle was differentiating exposing from marketing a product. As much as I consulted the course book, Technical Communication 11th edition, I could not find the “clear” line that separates selling a product from explaining what it is and how it works. I had to ask my peers as well as professor Voisard for help, and even then I was not completely sure if my paper was being molded inside the boundaries of the assignment description. Nevertheless, I worked really hard to write it using the proper language tone as close to the assignment description as possible.
In conclusion, I realized that the wording of any type of professional document is the most important part, besides the content, in any written system of communication. Meaning that, if the correct dialect is not used, then whatever message is trying to be delivered will not be understood properly. That is why I spent quick a lot of time making sure that the tone of my paper was consistent throughout. But not only that, but I also had to deal with my bad habit of mixing dialects in English as well as in my native language, Spanish. To deal with these issues, I also searched online for helpful articles on the subject. Unfortunately, they were not as useful as I wished they were. Basically, those articles were repeating what the course book was already telling me. At that point, I decided to give it my best try. I am satisfied to my final draft but it was not easy at all.
Note: The first draft of this assignment was lost due to not creating a separate document, but instead, editing the first draft after the peer review and presenting it as a final. My apologies.