GAINING RUNNING SPEED & ENDURANCE.
The Applications Of a One Mile Daily Run Workout
Diego Rodriguez
The City college of New York
Abstract
If an average person runs one mile every day, for five days, would their endurance and speed increase? Would they stay the same? What would happen? The answers are yes, if an average person decides to start running daily suddenly, their stamina and speed will increase due to the nature of our bodies biology. Which their first reaction to strong muscular stimuli is to improve its conditions by focusing more energy on healing damaged muscular tissue resulting from whichever physical activity is perform. Our muscles can adapt and become fitter for future instances where the same, or more muscular strength might be needed. This lab report demonstrated that an average person speed and endurance could increase within the first five days of starting running one mile per day.
Introduction
The incrementation of speed and stamina are essential skills most athletes try to maintain for as long as they can while competing. In sports where speed and endurance are crucial, athletes spend countless hours perfecting their technique and incrementing their speed and stamina. Through different methods specialized for whichever activity they need to perform for an extended period, as fast as possible, athletes can get the most out of their physical condition. However, methods can vary depending on which muscle groups are required to perform the task in question. Elite marathoners have to maintain a particular workout regiment, as well as the proper diet to either increase or maintain their physical condition, ready for the next marathon.
According to the article, Average Human Running Speed: Broken Down Age-Wise, the average running speed of a regular person is between 15 to 10 miles an hour. On the other hand, people who often run, have an average speed of 8.5 miles per hour, this is between the ages of 18 to 34. Then we have exceptional people like the elite marathoner Ryan Hall. Who according to the article, People Running Ryan Hall’s Marathon Pace on Treadmill, Hall ran the 2011 Boston marathon at an average speed of 12.6 MPH, or 4:46 minutes per mile, completing the marathon 02:04:58, demonstrating the considerable gap between ordinary people and elite marathoners. Nevertheless, average people can increase their speed and endurance by a significant amount by doing a medium difficulty training level workout. Since elite marathoners are already at their peak, an ordinary person who is just starting to train will obtain exponential results. If an average person runs one mile every day, for five days, then their endurance and speed will increase due to the constant exercise.
Methods & Materials
In the expand of 5 days, the subject ran one mile every day in an attend to record the time, distance, and speed at which one mile passes. The methods used to record the data consisted of an app called MayMapRun, which allows for accurate measurements of time, speed, and distance. For the most part, CCNY gym facilities were used to record the data. However, outside paths were also important for the experiment due to CCNY closing during weekends and other extreme weather conditions. Areas used include Washington Heights neighborhood and the surroundings of CCNY campus. The unchangeable variable was the distance, which was measured on miles; the other variables were the time, minutes from which average speed derived (mpm).
As for other materials used during this experiment:
- Sport clothes
- Plenty of water/Food
- Journal to record the measurements
Results
Table 1: Data collected during the experiment, date, distance as the constant, time and average speed as variable being tested.
| Date | Distance (Mile) | Time (Minutes) | Average Speed (mph) |
| Sat, March 1 | 1 | 8:10 | 8 |
| SUN, March 2 | 1 | 10:36 | 10.3 |
| Mon, March 3 | 1 | 8:00 | 8 |
| Tues, March 4 | 1 | 7:39 | 7.2 |
| Wed, March 5 | 1 | 6:32 | 6.2 |
The data collected demonstrates a positive correlation between time and average rate. During the first day of receiving data, the subject performed a little bit over the standards of 10 to 15 mph with measurements of 8 mph or one mile every 8 minutes. See table 1. However, on the second day, the subject performed at 10.3 mph or one mile every 10:34 minutes. The last two days of collecting data showed an exponential increase in speed and time. With measurements of 7.2 and 6.2 mph, or one mile every 7:30 and 6:20 minutes.
Analysis
The results showed a positive correlation between time and speed, from which can be deduced that indeed, a regular person’s average rate and endurance can increased between the expand of 1 to 5 days of training. During the first day, the subject obtained results that exceeded expectations with 8.0 mph or 1 mile every 8 minutes. However, during the second day, the subject performed lower at 10.3 mph or 1 mile every 10:34 minutes, which was probably due to muscular soreness from the prior day. Nevertheless, the last two days showed a considerable increase in average speed from 7.2 and 6.2 mph, or one mile every 7:30 and 6:20 minutes, which demonstrated that indeed speed and endurance increased. See graph 1.
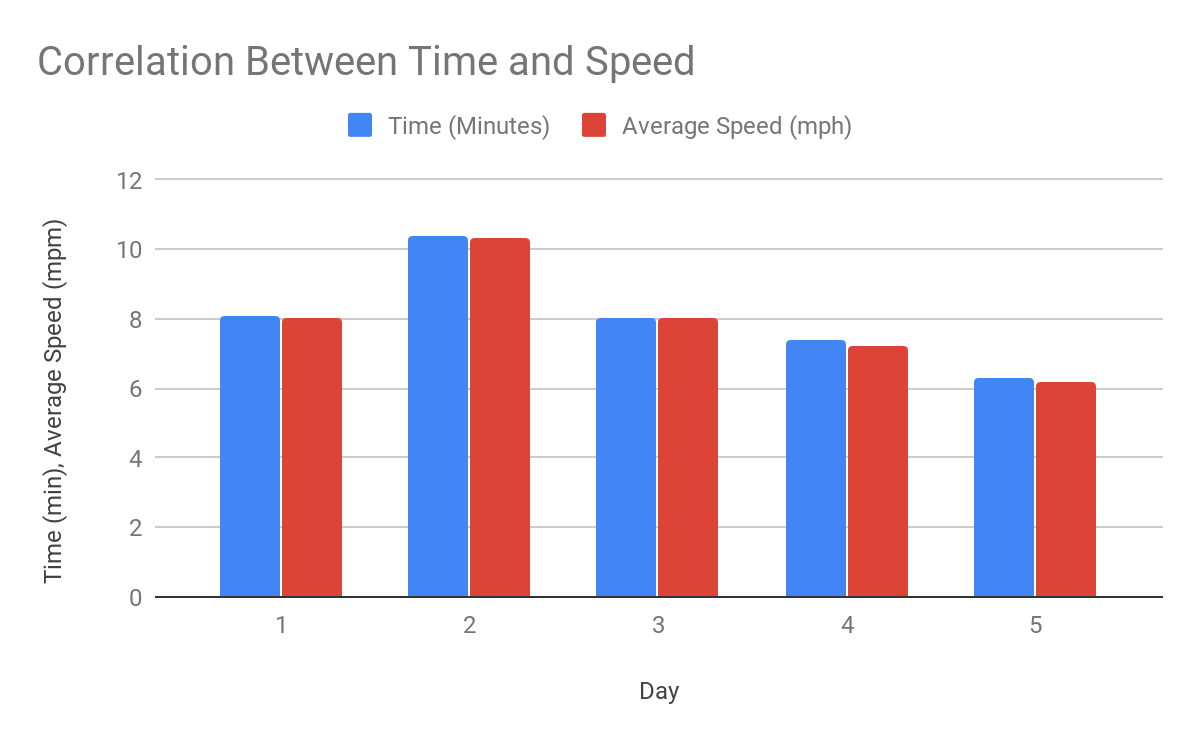
Graph 1: In this graph, the correlation between time and average speed showed a close relation, and despite what it might look like, there is a positive correlation between the two.
Conclusion
In conclusion, the results obtained from the experiment showed that a regular person who starts to train consistently will have an initial exponential increment on stamina and speed. This is something known by athletes as newbie gains. When we expose our muscles to an unusual level of training, our bodies compensates the demand of strength needed to perform the activity. By focusing lots of energy on healing the micro-cuts muscle fibers suffer from the training, provoking our muscular mass to increase, and depending on the type of work out, our stamina will increase, and the time we take to perform that activity will also decrease.
Further experiments could improve the accuracy and precision of these results by using more reliable tools to measure the of time, distance, and speed. Also, instead of five days, expanding the experiment for weeks or maybe months could produce better data. In addition, having multiple subjects participating on the experiment will provide more reliable data as well.
Work Cited
Hamilton, M. (2018, September 16). Watch: People Running Ryan Hall’s Marathon Pace on
Treadmill. Retrieved March 03, 2019, from https://www.runnersworld.com/runners-stories/a20814134/watch-people-running-ryan-halls-marathon-pace-on-treadmill/
Livingit, T. (n.d.). Average Human Running Speed: Broken Down Age-wise. Retrieved March
03, 2019, from https://www.iamlivingit.com/running/average-human-running-speed
Technical Communication PDF 10th Edition by Mike Markel Full. (2018, February 07).
Retrieved March 03, 2019, from https://vimeo.com/70930852
Experiment Images


Self Assessment
There is a huge difference between writing a lab report using a thesis you developed yourself and writing one with the premise already given. For this assignment, the biggest challenge was to come up with a simple, but at the same time, serious thesis. I have worked on a few laboratory reports over the course of four years since I came to the US. However, they were not as difficult as this one. Because the experiment I decided to use to test my thesis was designed by myself, I became self-aware of how picky I had to be in order to obtain the most reliable results. Meaning, I had to be really careful when recording my results. In an instance, I had to repeat a session because the numbers I got did not match. Just as a reminder, my experiment consisted of running 1 mile every day as fast as I could, and that is not an easy task, so having to repeat that is not fun at all. But I wanted to get good results, so I had to do it again.
Other aspects in which I notice improvement was during the peer review. It is always useful to have a peer look over your work. It helped me with grammar and structure in general. As an immigrant whose first language is not English, this type of activities are always useful. As for other sources I used to improve my writing, Grammarly was indeed pretty useful as well.
Note: For this particular assignment I have a semi-first draft. However, instead of posting separately, I decided to post it at the end as a pdf file.